Editing a user stitch library
-
To edit a user library, select one of the libraries from the User libraries (V3) tab and then .
User libraries created in earlier versions cannot be edited. If you wish to do so, first migrate a user library to version 3. For details of migrating a stitch library see Migrating a user stitch library
-
The Edit Stitch Library dialog opens.
Both description and language can be edited.
There are two views of the stitch library; the table view and palette view. Swap between the views by selecting the appropriate tab.
In the table view, the visible stitches can be filtered and the width of the columns adjusted. See Viewing a Stitchmastery library for more details
Either view can be used for either editing an existing stitch or adding a custom stitch. The palette view also allows for the editing of palette drawers.

-
To edit an existing stitch either double click on the stitch or select the stitch and then select from the tool bar.
The Edit Stitch dialog opens ready to edit the selected stitch type.

The following explains the different values and how they are used by Stitchmastery;-
-
Consumes this many stitches - this is the number of stitches that need to be on the needle in order to work this stitch. This is used when generating a chart from written input and also to validate charts. See Validating charts for more details. For stitches defined in the Stitchmastery libraries it is not possible to edit this value as it forms part of the basic stitch definition. The value can be edited for custom stitches added to the library.
-
Produces this many stitches - this is the number of stitches that will be on the needle after this stitch is worked. It is used to calculate the stitch count when generating output text and also to validate charts. See Validating charts for more details. For stitches defined in the Stitchmastery libraries it is not possible to edit this value as it forms part of the basic stitch definition. The value can be edited for custom stitches added to the library.
-
Spans this many stitches - this is the number of squares on your chart that the stitch will take up, width-ways. For stitches defined in the Stitchmastery libraries it is not possible to edit this value as it forms part of the basic stitch definition. The value can be edited for custom stitches added to the library.
-
Name - used to generate the initial text for the key entry, except when 'Display string' is defined and then 'Display string is used instead.
-
Abbreviation - used for the written output, except when 'Display string' is defined and then 'Display string is used instead.
-
Display string - an optional text that is used for the key and written output when the desired output text has a format that would not be parsed correctly. For example, 'sl1, k1, psso' has got commas in its name. Hence the parser would 'misread' this as 3 different stitches instead of 1. Another example is '(k1, p1, k1) in 1 stitch'. Here the brackets and commas would again confuse the parser.
-
Long description - can be used in key entries if desired.
-
Mirror - used by Stitchmastery to identify the stitch that is the mirror image of a stitch. Used by the 'Flip selection vertically' feature so that left leaning cables are flipped to right leaning cables, etc.
-
Wrong side - used by Stitchmastery to identify the stitch that is the equivalent stitch on a wrong side row. Hence a purl stitch on a right side row is a purl, but a purl stitch drawn on a wrong side row is a knit stitch. This is used to generate the text for the key and also to generate correct written instructions for wrong side rows. Also to parse written instructions correctly when generating a chart.
-
Appearance - shows the appearance of the stitch in both the chart and key. Select Edit Appearance to see more details.
-
Drawer - shows the name of the Palette drawer where the stitch can be found.
Both Name and Abbreviation are recognised by the parser when parsing written instructions in order to generate a chart. See Working with Text Input for more information. For libraries that have language set to English, the name and abbreviation values are checked to ensure that they can be parsed correctly. If not, then a warning message is displayed.
-
-
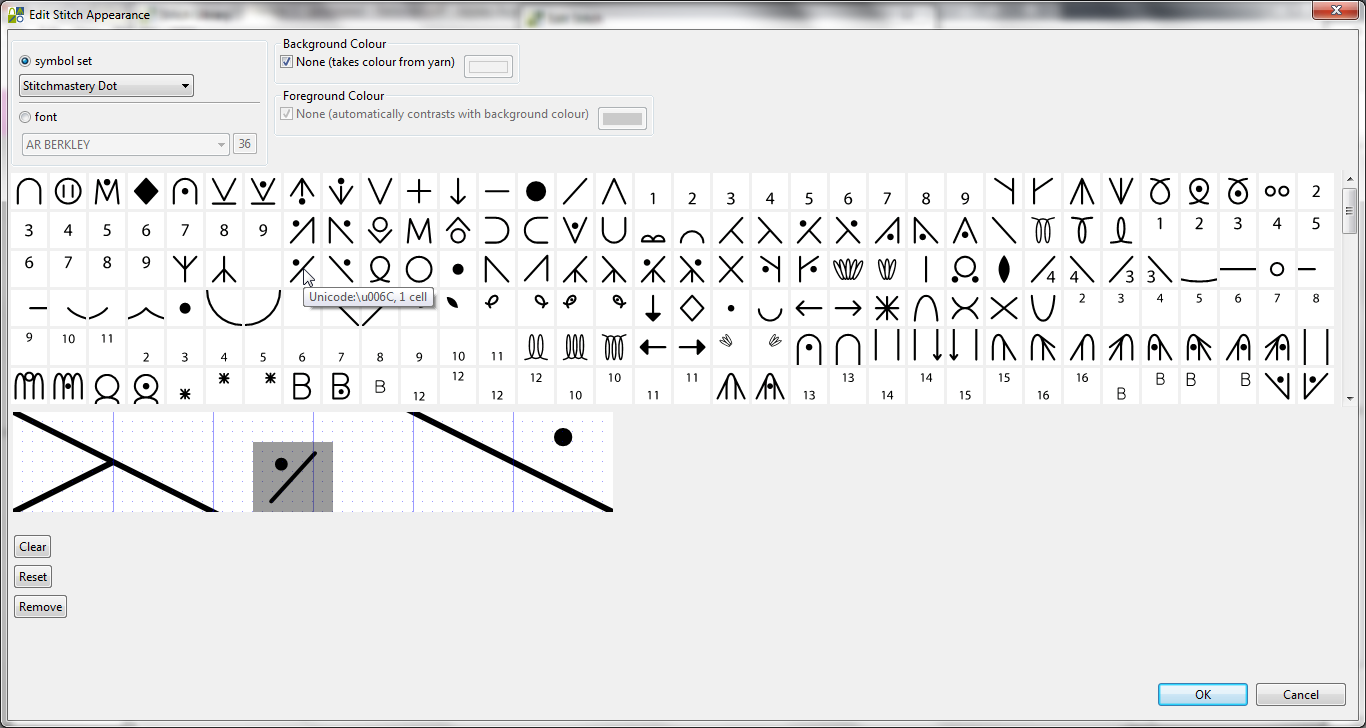
To change the appearance of a stitch select the Edit Appearance button. The Edit Appearance dialog opens.
The Edit Appearance dialog allows you to change the symbol and the foreground and background colours of the stitch.
Stitchmastery allows you to select symbols from any font installed on your machine, in addition to 8 Stitchmastery symbol sets that are embedded in the software. Details of the symbol sets can be found on the Stitchmastery website at www.stitchmastery.com/stitchmastery-symbol-sets
You can combine symbols from different symbol sets in one stitch. You can also combine symbols from symbol sets and from a font. However you can only use one font in any one stitch.
If you wish to remove all existing content to start with a blank canvas, use the Clear button.
To use one of the symbol sets first select symbol set and then choose from one of the 8 symbol sets. The dialog will display all of the symbols for the selected symbol set.
Then use your mouse or tracker pad to click and select the area in the working area in which you want the new content to appear. When you have selected the area you want, click on the desired symbol and it will appear in the working area below. You can add as many symbols as you like from any of the symbol sets.

If you are not happy with the placement you can use the Reset button to return to the original appearance.
The Remove button operates like an 'undo' by removing added symbols starting with the most recent addition.
To use a font first select font and then choose from any of the fonts installed on your machine. The dialog will display all of the characters for the selected font.
Unlike the Stitchmastery symbol sets, font characters behave like writing text. Click with your mouse or tracker pad to set the start of a text line. The size of the character is adjusted by the size field in the top menu. You can only use one font or font size in any one stitch. You can add as many characters as you like.
As with using the symbol sets you can use the Clear button to clear all content to start from scratch. You can also use the Reset and Remove buttons as described above.
Press OK to finish editing the appearance of the stitch.
-
(Optional) If the stitch type being edited has previously had edits applied but is not a custom user stitch, click Revert to System Settings to remove all user edits and revert to the original values for that stitch type
-
Select OK to finish editing the stitch.
-
To add a custom stitch when in the table view, select → from the tool bar.
To add a custom stitch when in the palette view, first select the drawer where you want to place the new stitch, then select → from the tool bar.
A new stitch with default / blank values and a generated default name is created and the Edit Stitch dialog opens ready to edit the new stitch.
-
To duplicate a stitch first select the stitch to be copied, then select from the tool bar.
A copy of the stitch is is created with a generated name is created and the Edit Stitch dialog opens ready to edit the duplicated stitch.
-
In the palette view stitches can be moved around in drawers and to an adjacent drawer by selecting and from the tool bar. These commands only move the selected stitch one position at a time. To move a stitch to another drawer it is often quicker to select and then choose a new Drawer.
-
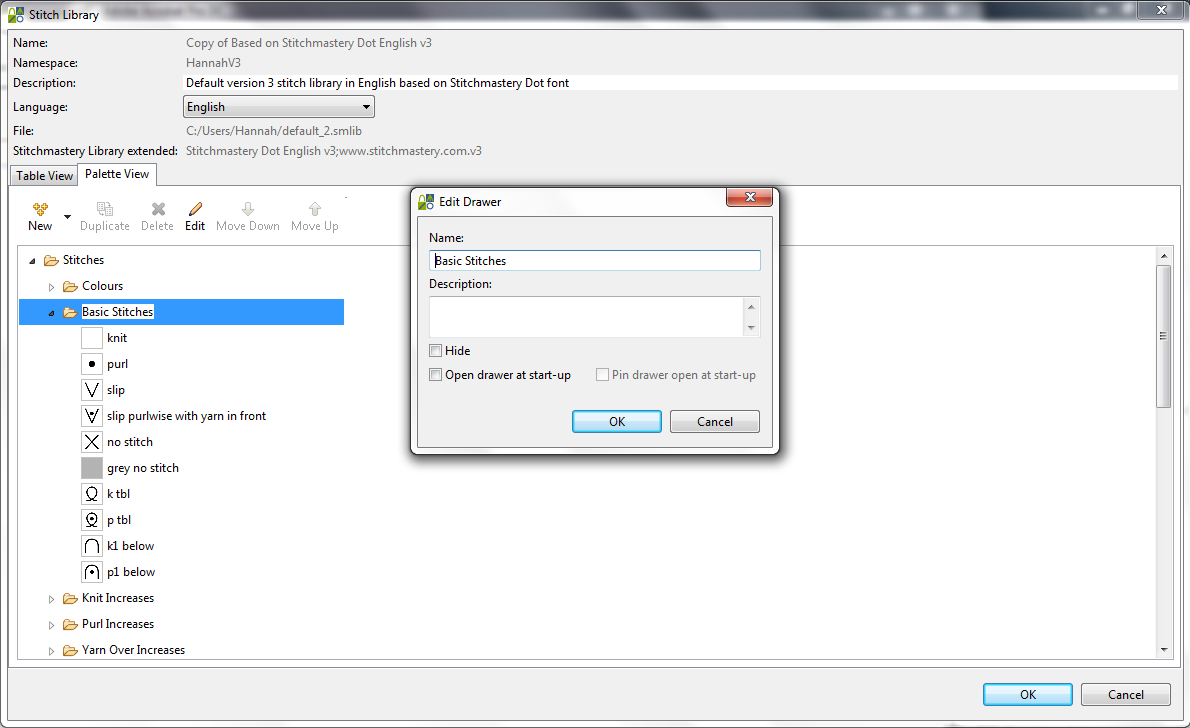
When in the palette view, a drawer can be edited by either double clicking on the drawer or by selecting the drawer and then from the tool bar.
-
The Edit Drawer dialog opens ready to edit the selected drawer.

The name of the drawer can be edited and a description added. Also the drawer can be either hidden or pinned open.
-
Select OK to finish editing the drawer.
-
Select OK in all dialogs to finish editing the stitch library and to save changes.
-
To use the edited stitch(es) in a chart set the stitch library that you have just edited as the 'active' stitch library for a chart diagram file. See below for details of how to do this.
In order to be able to use a stitch library it needs to be set as the 'active' stitch library on a chart diagram file. Then, when the chart diagram file is opened, the palette will be filled with stitches from the 'active' stitch library. This only applies for version 2/3 (.knt2) format chart files. Version 1 chart files (.knit) will always use the version 1 stitch library and the stitch library cannot be changed.
The 'active' stitch library can be selected when a chart diagram file is created.
If a chart diagram file exists already and you want to change the 'active' library then follow these steps;-
-
Open the chart diagram file.
-
Select → from the main menu.
-
In the Edit Diagram Properties dialog, select the Stitch Library and Text Templates tab.
-
From the Stitch Library drop down menu, select the desired stitch library. Only stitch libraries in the version 3 format will be listed.
-
Select OK.
If the system library that the new 'active' extends is different from that of the existing library then any 'system' stitches in the chart file are swapped out. In addition the palette contains stitches from the new 'active' library.
Comments
0 comments
Please sign in to leave a comment.