Viewing and editing stitch libraries via Preferences
-
Open the Preferences dialog. See Preferences for more details.
-
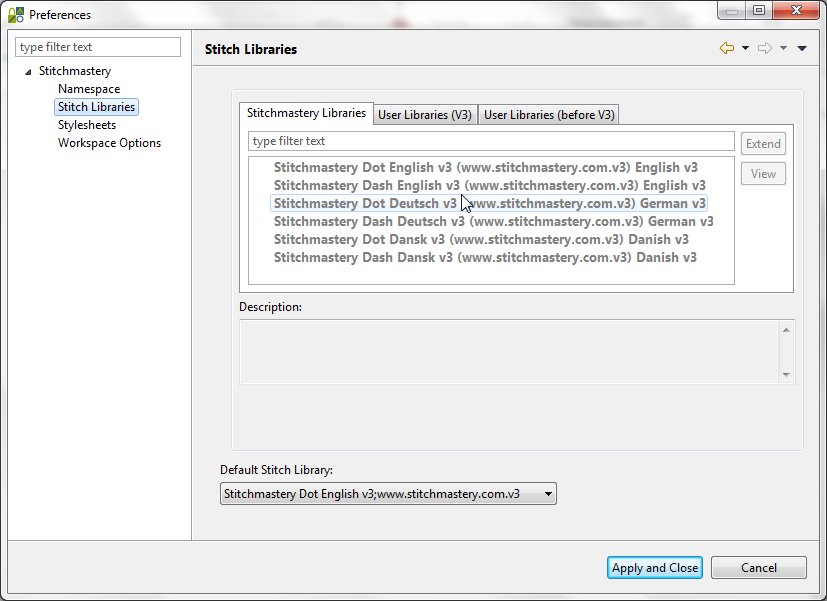
Select → to see all the stitch libraries that are currently known to Stitchmastery.

Stitchmastery libraries, v3 user libraries and v2 user libraries are displayed under separate tabs. Currently there are six Stitchmastery libraries. See Stitchmastery Libraries for more details.
Initially there will be no user stitch libraries. See Creating a User Stitch Library to find out how to create a user stitch library.
Default stitch library: when creating a new chart diagram file, its stitch library alias is set to the current default stitch library unless another stitch library is specifically chosen. The stitch library of a chart diagram file can be changed later by selecting → .
-
To view a Stitchmastery library, select one of the libraries from the Stitchmastery libraries tab and then .
-
The Stitch Library dialog opens. As this is a Stitchmastery library that is being viewed the dialog is in 'Read Only' mode.
There are two views of the stitch library; the table view and palette view. Swap between the views by selecting the appropriate tab.

-
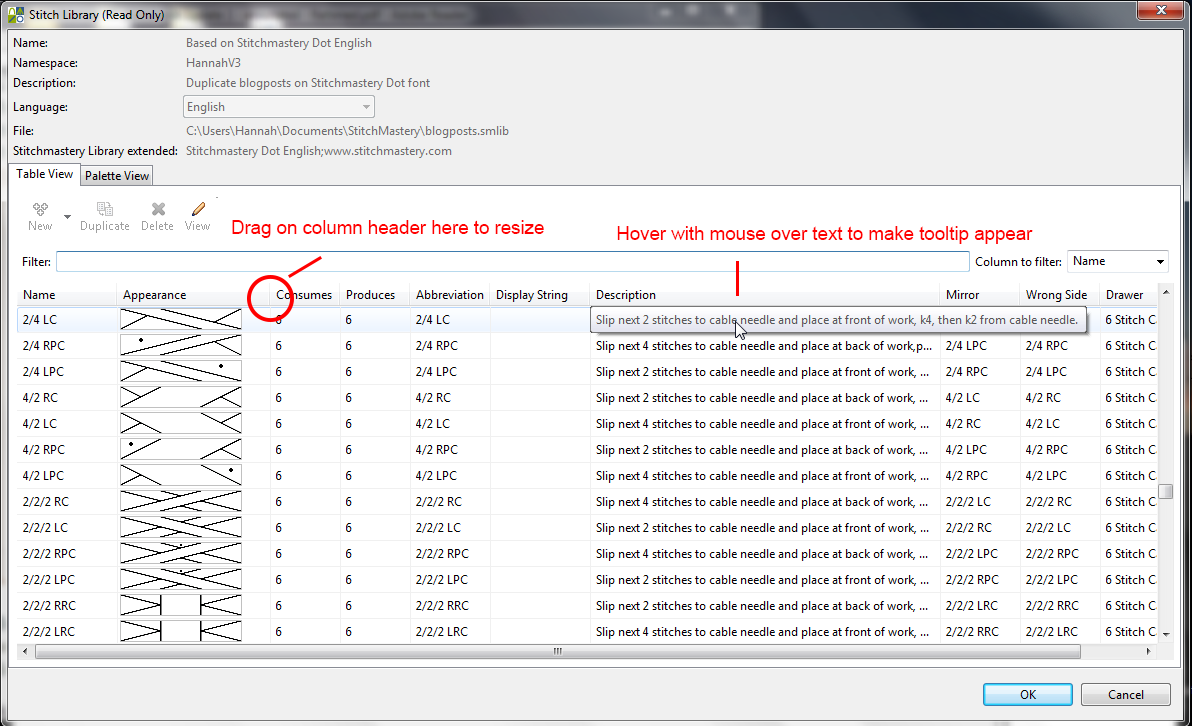
In the table view all stitches in the library are displayed in a table. The visible entries can be filtered by entering text in the Filter box. By default the filter text is matched to text in the Name column. However, the matching can be changed by using the Column to filter drop down selection. The example below shows the Column to filter set to the Drawer column. By entering 'cables' into the Filter box, only stitches in any of the drawers with 'cables' in their name are displayed.

-
Sometimes the width of the column is not wide enough to display its contents. For example the Appearance column is not wide enough to show the wide column stitches. In this case the column can be sized by dragging the column header to the side. The location to drag the column is circled in red in the screenshot below. For those columns that contain text, the full text in the column can be displayed by hovering with the mouse over the text until a tooltip appears.

-
In the palette view all the drawers in the palette and all of their contents are displayed in the same structure as in the palette. To show or hide the contents of a drawer click on the triangular icons to the left hand side of the drawers. They are circled in red in the screenshot below.

-
To view a stitch in more detail either double click on the stitch or select the stitch and then select .
-
The View Stitch dialog opens to show details of the selected stitch type.

-
For an explanation of the different values and how they are used by Stitchmastery see Editing a user stitch library.
To create a user library, select one of the libraries from the Stitchmastery libraries tab and then .
-
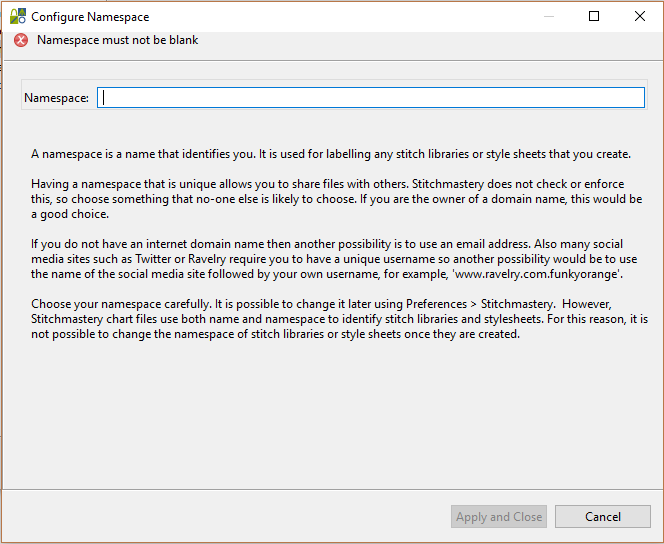
If this is the first time that you have created a user stitch library or stylesheet and the 'Namespace' value has not yet been set, the Configure Namespace dialog will prompt you to enter a 'namespace' value.
The 'namespace' is an identifier that is used to label the stitch libraries and stylesheets that you create. It is important to choose a value that is unique to you to make it easier to share stitch libraries and stylesheets with others. For more information on choosing a namespace see What's a namespace?
It is possible to change the namespace later but it is not possible to apply such a change to any existing stitch libraries or stylesheets.
Enter a value for namespace and then select .

-
The Create new User Stitch Library dialog opens
Name contains a generated name. If desired, type in a different name. The combination of name and namespace must be unique as these are used for the alias that is referenced from a .knt2 file. It is NOT possible to change the name of a stitch library at a later date as this would invalidate the alias.
Namespace defaults to the current namespace value. It is NOT possible to change this value as this would invalidate the alias.
Description is copied from the extended library. If desired this text can be edited. It is possible to edit it later.
Language is copied from the extended library. This is used to identify non-English libraries to suppress warnings about non-English characters that would cause problems if parsing using the text to chart feature. If desired select another language. It is possible to edit it later.
Folder defaults to the home directory. To select a different directory use the Browse button.
File name contains a generated default name. If desired, type in a different file name. The file extension must be ".smlib".

-
The Stitch Library dialog opens ready for editing. For details of editing a stitch library see Editing a user stitch library.
To duplicate a user library, select one of the libraries from the User libraries (V3) tab and then .
-
User libraries created in earlier versions cannot be duplicated. If you wish to do so, first migrate a user library to version 3. For details of migrating a stitch library see Migrating a user stitch library
-
The Create new User Stitch Library dialog opens
Name contains a generated name. If desired, type in a different name. The combination of name and namespace must be unique as these are used for the alias that is referenced from a .knt2 file. It is NOT possible to change the name of a stitch library at a later date as this would invalidate the alias.
Namespace defaults to the current namespace value. It is NOT possible to change this value as this would invalidate the alias.
Description is copied from the original library. If desired this text can be edited. It is possible to edit it later.
Language is copied from the original library. This is used to identify non-English libraries to suppress warnings about non-English characters that would cause problems if parsing using the text to chart feature. If desired select another language. It is possible to edit it later.
Folder defaults to the home directory. To select a different directory use the Browse button.
File name contains a generated default name. If desired, type in a different file name. The file extension must be ".smlib".

-
The Stitch Library dialog opens ready for editing. For details of editing a stitch library see Editing a user stitch library.
Comments
0 comments
Please sign in to leave a comment.